Apples Galore {Part Two!}

More on apples? .......well, yes! Yesterday I shared all about our Apple Week... and there is just one more piece to that puzzle... and it would be my favorite activity of our week. Well, maybe a tied favorite with making the applesauce.
We make a book called "The Apple Tree" using this poem:

Way up high in a big tall tree
_____ red apples looked down at me.
I shook that tree as hard as I could
Down came the apples
Mmmm were they good!
{On the blank line each child will choose a number of apples they would like to have in their book}

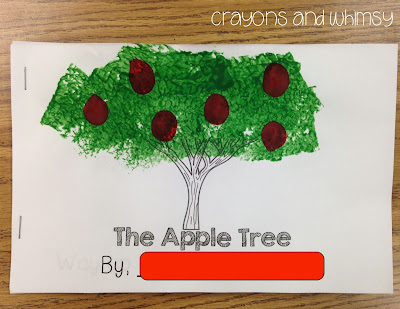
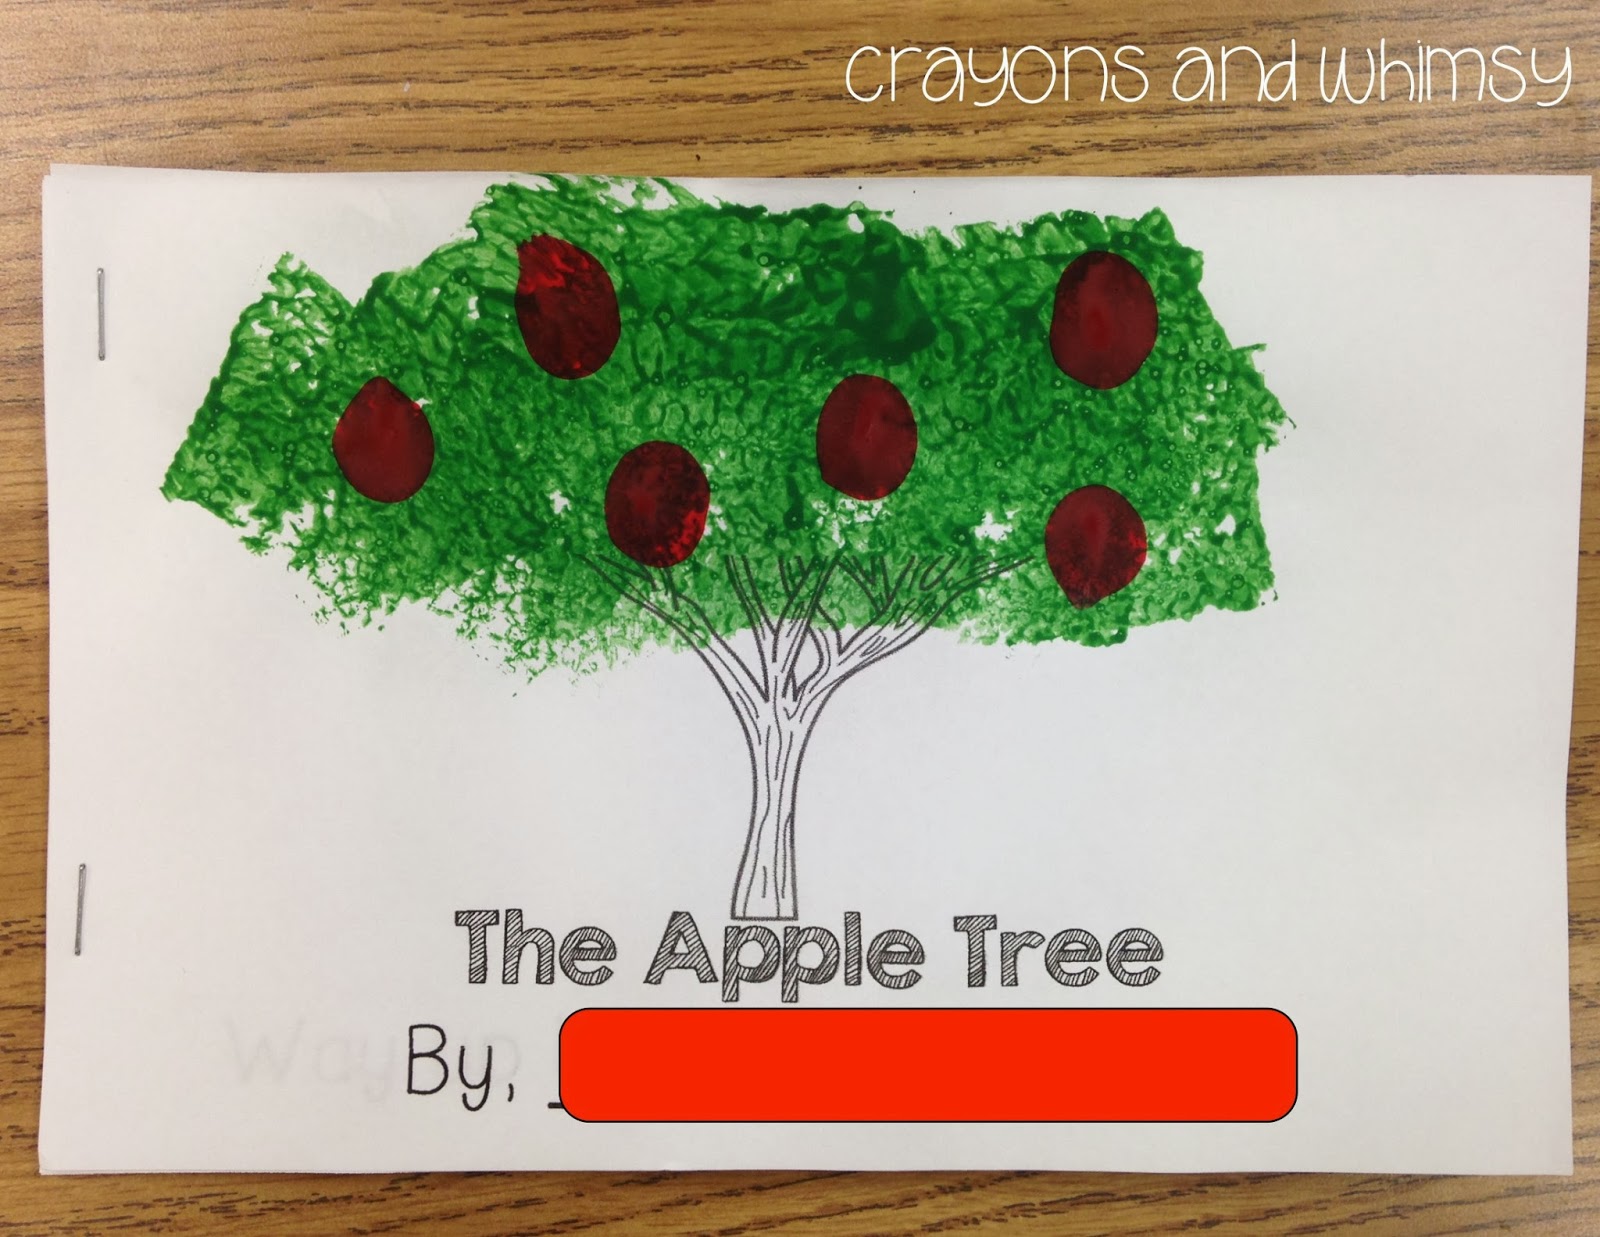
It looks a little something like this:

Now there are so many versions of this poem! Some have slightly different words and many have "2 apples" since you can use your fists to create two apples shapes to do movements with the poem. In fact when we recite it as a class I tell them we have to pick two because that is how many apples our hands can make!

Now on to their books... where they choose a different number than two.....

Step one: Sponge-paint-o-rama!! Yes, all 29 students sponge painted 5 pages each...so yes there were 145 painted apple trees in my room.

If that seems insane to you then they can just paint the cover and color in the other pages. Or color them all and keep the paint in the cupboard!

Step Two: More paint! Time to add apples!
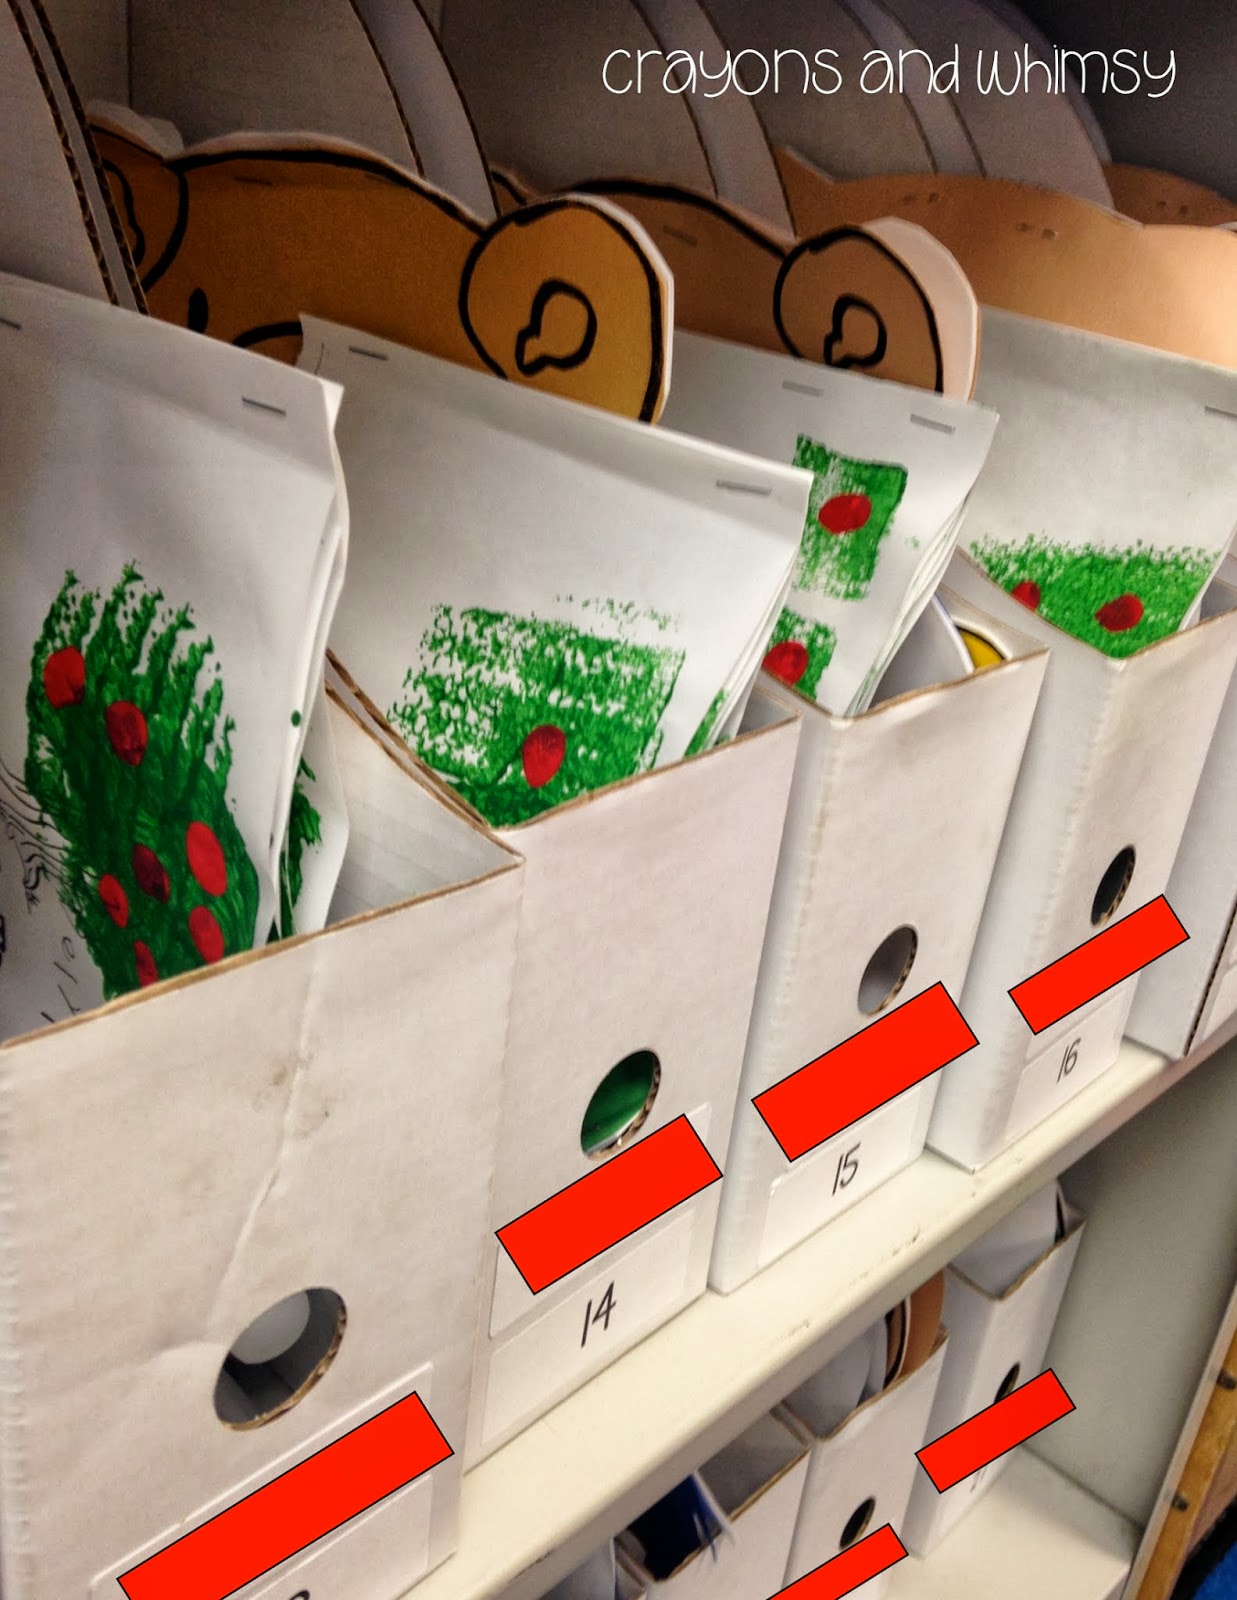
The above picture may be confusing because it is showing you four different books. Because if a child chooses to have 5 apples then EVERY page of their book has 5 apples.... and if a child chooses to have 3 apples then every page has 3 apples.... Get it?

And if you are thinking....more painting? And how to keep that all organized.... you see, you can not collate this puppy ahead of time because of the painting. But that's okay! The kiddos write their name on the cover and I quickly write their classroom number on the back of all the other ones.

But a non paint option is a red ink pad and they can do fingerprints that way... or just drawing some apples!  I think it looks good when they color the tree and use the ink pad for the apples, but when you paint the tree and add ink pad apples....well, they just aren't that bright and red!

Okay, so now the books are ready to assemble and read. After reading them all week they are tucked away in our book boxes!
This week we will continue to practice this poem in our language arts centers. I have large laminated cards that say the same poem. The students will get to use play dough to make "apples." This time we are using the store bought stuff, but check out {This Post} about having a play dough kit ready to go!


They will write the number word or number on the card with a dry erase marker.
And then read it using our apple pointer! {Note: In the picture above you can see I substituted play dough for red counters}


All of this available in my Teachers Pay Teachers store. Just click on the image below or right {here.}

Now it on to pumpkins, spiders and all that October fun!
1

Apples Galore!

Are you even allowed to teach kindergarten and not have Apple Week? I mean, come on... it is a staple of kinder fun!

We just finished our apple week and I loved every part about it! First up.... I have always read the book 10 Apples Up on Top and I have always made a class book from it. I had never thought of this awesome-ness though:
Can you say cute!? Thank you to Shari Sloane for that idea.

After reading the story the kids color their own set of ten apples using a pattern {most are AB at this point and I ask them to underline their pattern, then I check it before they can color} The apples are cut and put in a baggie.  Then later on in the week they will draw themselves with however many apples they would like filling in the frame, "_____ has ____ apples up on top." I like to do it this way so that they all color, pattern and cut ten apples even if they may only put four "up on top."
The cute photos will go next to the finished craft... once I get these puppies up on the wall!


We also read various stories about good ol' Johnny Appleseed. Then we did this directed draw project from Teacher Bits and Bobs. I loved it. They did their Johnny with a very cute apple tree background. I opted for a simple cut apart sentence.
But here's the best part. A few days later in their journals we wrote a little Happy Birthday sentence in honor of Johnny and I asked them to draw Johnny as best as they could remembering our drawing lesson from earlier in the week.....
Um, not bad!! This was with no direct instruction, however my sample of Johnny was out for them to reference. Quick breakdown of the above picture... LOVE the one in the top left and just realized that is my little new blue flat in the bottom left picture. I love these new shoes...
A. They are comfy B. They are cute and C. I bought them in Barcelona this summer and when I look at them I smile and think of that great trip....

Ok so I digress...back to apples....  We listened to the story "Apples, Apples, Apples" and practiced our new sight word "the."

A little more patterning...and a little more practice of the word "the." In case you can't make it out he wrote "The Apple Pattern" as a title.

Probably the biggest hit of the week was making applesauce. The second they walk in the door the crockpot gets going and we got to eat and enjoy right before dismissal. This is great way to start our unit on the five senses too!
That's all for now my friends... I have one more apple themed idea that I will share tomorrow in its own post.... just click HERE!!
1

Tactile Alphabet Sharing

Every year I try to think of a fun way to introduce the alphabet and word wall in my classroom. This year I did a tactile alphabet. This was something I used to do a while back, but had taken a break from. I forgot just how fun this is.
Those more-than-adorbs letter toppers are from Amanda Richardson

Why do I like this? It allows my kiddos to start sharing and getting up in front of their peers from the get-go! It sparks conversation and it works on letter names and sounds.

Here is one I did several years ago.... not sure why there isn't title. This was when my classroom had a circus theme:


And my little ones don't know what a Word Wall is... I mean, some of them don't know the difference between a letter and a word yet {That is one of my standards for the year RF.K.1c } But I love how it makes them look at the word wall every single day... good training, because I want them to look there ALL year.


The only bummer is that I don't start using the word wall in the more traditional way until about the 27th day of school {so yes, if you did the math right... I start this whole fiasco on the 2nd day of school.} In the meantime I do have my "Fish Words" up and running {this is what I call sight words... you can read more about this HERE and later these words will feature on both walls}
I do letter A to kick it off... and model how this is supposed to go down.....then I also do X because that would just be plain mean to some poor family! I have a little x-ray fish toy. I do have 29 students so for some letters I do two kids.  I put a little name label next to each item because they like seeing their name on the wall {I tried to work in one year a long time ago so that a child named Katie would share on K day etc... this just doesn't work.}

When the child brings in their item I put in the Surprise Can. What I love are some of the measures they will go to in order to sneak the item to me. It is actually comedy and one of the reasons I love my job. And then there are the kids that just hand it to me and maybe don't quite get the surprise element, but that is rare.
Above you see the Hh day "helmet" going into hiding. This child gave the clue "It is something you put on your head." And listen to these phenomenal guesses I got: A hat... a headband! I was impressed by their ability to factor in both the clue and the letter sound!  For this reason I think this is a fun idea to use in a kinder or first grade room. It can be an introduction to the alphabet or a good review with critical thinking fun!

This works well if the child has practiced a little bit at home and has a clue or two up their sleeve. Below is the letter I use to explain the process to the parents and to tell them their child's assigned letter. Jut click on the image to download this letter for you to use!

Happy Saturday!


2

Getting to Know Our Way Around Campus

This week we were busy! We read a few stories throughout the week about everyone's favorite cat, Pete.

Then today....we had a visitor! Pete came to our school {wink, wink!} This is a fun way for our new friends to learn the lay of the land. Not only did Pete take us ALL over the campus, we also met all those important faces the kiddos need to know.

Our search led us to meet the:
*Librarian
* Custodian
*Office clerks
*Health tech/Nurse
and of course... the last stop was our principal!

Each stop had a clue to send us off to the next place! In the picture below you can see the clue just sitting and waiting as my kiddos talk and meet the librarian who is telling them she saw a blue furry ball racing through her library just minutes before!
And reason number eight million and two that I love kinder is that they didn't see the clue sitting there immediately. It was tucked just a tad behind that blue crate that it took a minute.... And then.... they see it! The clue! They all know what that yellow card is because our first clue, looking the same, had magically shown up in our classroom with the book  Pete the Cat Rocking in My School Shoes {in the picture at the top of the post}. This book is PERFECT for our adventure since it is all about Pete roaming around a school.

Our clues have a note inside about how Pete wants to meet us but he keeps missing us.... but he doesn't cry because he can't find us {goodness no!} he just keeps on searching!  We also referred to the book from time to time.  I would love to share the cards with you, but I can't because of copyright reasons. However, all you need to do this yourself is the book and a stuffed Pete. The clue cards were extra!

Back to the principal's office... aka the last stop of our search!! The little ones eyes are searching and searching around the room....Where is he? Where is Pete? Our principal reads the note from him and then .... drumroll please.... he was spotted hiding on a shelf in the back. Pete's note explains that this is his helper who stayed behind at our "groovy" school to watch over us since Pete is a busy cat!

And now... since she has got their attention....as in you could hear a pin drop! I mean, come on...A. They are in the principal's office and B. They can't believe there's a rock n' roll cat roaming the halls! Anyway, she lists all the positive things that can happen to explain why a child may come back to her office in the future....then she mentions, "Maybe, just maybe someone will make a bad choice and have to come here to talk to me about it." And you see their sweet faces thinking....um, not me! Not me! {fingers crossed} And she reviews the school rules so they can be sure to never enter her office for a bad reason!

And to wrap it up...a dance party in the principal's office! Because what is more fun than rocking out to any or all of Pete's songs WITH your principal!!
When we got back to class we had to journal about this whole experience!
I did this entry as a directed lesson since we have been using the sentence frame "We like the ___" in other things this week.

And this evening I have received two parent emails saying that their kids can't stop talking about Pete visiting our school! It was a groovy and "radtastic" {just stole that term from my dear friend Kelley at theTeacher Idea Factory}

Oh and one last thing.... Last year we did a similar "get to know your school" search using a gingerbread man {see that post HERE} but this time around I am saving him for the holidays!

Have a groovy and radtastic weekend!
3

The Tenth Day of School {Freebie!}

Today was our 10th day in school! I know, I know some of you are at 20 days by now. We're a little behind.

It was our first visit from Zero the Hero... he loves to stop by any day that has a zero in it...we don't get to see him because he has to rush to so many other schools to drop off presents!  However, we do finally get to meet this guy on the 100th day. You can {click here} to see a picture of Zero and me from the past school year.

But let's rewind, no talk of 100 -  we are only at 10! So back to Zero and his presents... every ten days he will leave us a sign which I forgot to take a picture of. It says , "Hooray Hooray You've been in school for 10 days!" There's some glitter involved and he pins this up on our Days of School countdown. Then he will leave us something shaped as a zero. Some examples are: peach ring candies, Cheerios, life savers, or even small donuts.

To celebrate 10 days we also make a necklace {we make a similar necklace on the 100th day but not the 20-90th days} I usually like to use pony beads for the 10th day necklace since they are a little bigger and easier to manage than these guys. And I think this is such good muscle development for their little hands - I love this activity.


You can download this necklace for free... just click on it below:
Check out our giant ten using 10 pieces of some zero-shaped cereal... which was also part of Zero the Hero's delivery to us:

Last up....the kiddos did this number train activity. Oh boy, this one requires a lot of organization for just ten short days of school... but they love it!
They had to trace their numbers 1-10, then cut them out and order them on the train cars. I even had them color the train cars in an AB pattern.

Lastly, we got our hand stamped with a picture of our new favorite guy...Zero the Hero! We look forward to his visit on the 20th day!

Do you do anything special for the 10th day in school?
1

Kindergarten Selfies!

Not sure the term "selfie" applies when painting rather than holding your phone toward yourself... but I'm going with it!

Today we finished a new favorite project of mine. It's a simple painted self portrait with their name... that's it. Nothing that flashy and new, but so kindergarten...so cute...and gives you such a great glimpse into each child's abilities and maturation.
I modeled this first and my only mistake was painting myself in a dress....because I noticed some of the boys' shirts were very "dress-ish" and I think every girl opted for a dress....next time, t-shirt and shorts it will be!

But these are great... and just kindergarten in a nutshell!


To prep...
I typed up my class names in letter boxes. You could do letter boxes that indicate whether a letter is tall, short, or "goes underground," but I just opted for regular letter boxes. You can download a copy here of the letter boxes PDF file {this freebie file just has the alphabet and I strongly suggest you type out your actual names to make it easier on you.} I also put a blank page in the download which you could use if you wanted to hand write the names. And just for fun... here is a download of the same thing as a Word doc, but you will need to add your own fun font!

I had all the names cut up {and therefore mixed up} in baggies. Once the paintings were dry the kids had to spell their name on their painting. I didn't correct them or make any changes to what they did. You can see how this is very educational for me as a quick start of the year assessment.

Side note: We have been doing many activities with their names and the names of their classmates.

This little friend was done and just as he was about to leave he caught himself that the "a" was backwards and flipped around himself.. self correcting already!? Not bad. There were a few kiddos who had a few letters backwards, out of order or {my favorite} written "mirror backwards."

Although this is a great assessment tool, I am thinking for next year I am going to have them arrange the letters first so I can see what they can do on their own, but I will help them to make it right.

Another teacher who used to do this idea had her class do these paintings both at the beginning and the end of the year as a "now and then" activity to show growth {in which case you would want a few reversals and such for the first one.}

I have never done it at the start and finish... but I used to do this same thing at the end of the year for Open House. They would paint themselves in the same way and then tell me a bit about their school year. I used a frame and took dictation for this.

You can see that these paintings have a bit more detail... that is kinder in May vs. kinder in September.

If you don't already do something like this....Try these...any time of year... because you see the personality of each child in their paintings! You can imagine the parents love to see them, too!
3

How Many Buttons Does That Cat Have?

My class has been working on numbers this week....actually numbers 1-10 to be specific. We are learning to count in order to tell the number of objects in a group {K.CC.B.4} and I want them to be able to tell me {or write down for me} exactly how many there are of various things {K.CC.B.5}...and today those things are buttons!

So I just created a little math center to make our number practice a lil more fun!

We have been reading some books about various cats and things like that - so why not have a cat themed math center?

There are 10 of the cards that you see below and the little ones need to count the number of buttons on each card. Can we talk about the cuteness of Melonheadz clip art?

Oh and while we are on cuteness... do you see the washi tape on that clothespin? The washi tape obsession continues...

I did have most of my kids record their numbers.... but I was torn on whether to include this part since it is so early in the year, but they impressed me!
I will say that I had meant to run off the recording sheet without lines since we haven't dealt with those puppies too much yet... but again, they impressed me!

I also have numeral and number word cards {and full sheet sizes of the cute cat and his buttons}
I have a ton of buttons in my classroom... but if you don't many other things can be a button: pom poms, cotton balls, basic math counters and even pennies!

Later I look over and see this creation by some of my early finishers... how sweet are they?! I even added this picture to the unit itself as an extension idea.

I just uploaded this cat math center game to Teachers Pay Teachers!

There are actually a few versions of the print outs you get when you buy this game- the main thing is that you can rock full color or go black and white if color ink is the issue:


You can check out this Kitty Cat Button Counting Game by clicking on it!

That's all for now... September in kindergarten is exhausting so I am off to bed!
0

Supply Round Up!

There have been many posts about organizing classroom supplies, but I thought I would share my two cents on the subject.

I use community supplies and ask parents NOT to label any of the things that they donate to our classroom with their child's name.

I like to use these big caddies that are from Target. They are large and in charge... but there is a compartment for everything. I have been using these for about four years. The last set were purple and lasted three years and just this summer I went on back.... in search of the same ones crossin' my fingers Target would still have them and they did!! Yay! I couldn't find them on Target's website to share it with you {but honestly I just saw them there!} but this is a link for Walmart.
I don't put a table name or number on the caddy itself and this is mainly because I feel it looks tattered pretty quickly and isn't necessary so I adopt the "Less is More" theory here.

Now, I just color coordinate each caddy using washi tape. Are you not in love with washi tape? I am! I want to use it on everything. And now I am not even satisfied with the options in Michaels or Hobby Lobby... I get my washi tape fix on Amazon {check out my latest purchase}...and I have heard Etsy has some good options too.

Here is each item inside one caddy:

And then the same matching washi tape is around the caddy itself- which makes it look cuter, but clearly serves a purpose:
I have a big roll of each washi tape I used so it will be easy to quickly slap some on a new glue stick when I replenish... but if I run out I am not going to be worried about finding the exact same tape. I was thinking I can just try to stick to the color...so in this case purple... and just add a stripe of the new washi tape on the outside:

And in case you have never used washi tape it is very easy to remove so I would easily be able to lift washi option one if I needed to. The key is to simplify life... not be running 80 errands to find the same exact tape in March when I run out. Right?

For this same reason... you know, the one about keepin life simple... I chose NOT to do this:
It can be a good idea to put washi tape on your pencils depending on other systems in your room.

I keep 7-8 sharp pencils in each caddy. The kiddos know that if a pencil breaks they can go on over and trade their pencil out for a fresh one here:
I decided I didn't want table specific pencils because I would need to make sure the sharp pencil jar not only had new pencils, but ones for every table... um, that seemed like too much work. So pencils have no label! I also think that will cut down on how much tape I need.

And apparently this post is just as much about keeping life simple as it is about organizing...but notice the hand writing on the pencil containers. Once upon a time I used to do everything in paint pen and was just confessing this same thing in THIS POST about playdough last week... but then I moved on to vinyl letters... and well, that was the plan here... and it didn't happen and school was about to start... so once again, I rocked the paint pen. And I'm sharing this because sometimes I would stay that extra half hour... that then turns into an hour just to Cricut some vinyl letters... but time is ticking so I went paint pen again, apparently I'm bringing it back for the 13-14 year.... I have to choose my battles projects! Right!?

As for the scissors... you probably noticed that the colors also match... just in case you didn't you can take a look at the green caddy:
Green washi on glue and crayons....green scissors and a dot of green marker {with a Sharpie} on the erasers (which sadly you can't see... look above at the purple picture)

I bought the scissors myself this year. I have never done this before and look at this crazy Target cart in July {as I shared on Instagam}
Why did I do this? Well, let me count the reasons why:
A. They are on sale in the summer !
B. I know Fiskars are a good brand so I will never hear "These ones don't work!" And whenever a child said that it almost always was a different scissor brand or a pair of Fiskars I had hung on to for just one year too many.
C. I won't have any fighting over the color of the scissors or for the ones that are slightly bigger or smaller, etc.
D. It looks nice to have a color theme for the whole caddy.

So, I will update you later to see if my scissor purchase is as grand of an idea as I think it will be.

So that's it. That is how I organize supplies. You may have noticed I am starting with 8 packs of crayons. Those were donated in June and is new for me....but I am kinda excited. I will be blogging about my color unit we start with and I think these 8 packs will be the gentle and easy start that we need. We will graduate to the 16 packs in October {provided by parents} and then to 24 packs {as seen in picture above} later. Gives us something to celebrate every so often in class.

Some years I also graduate the little ones to their own personal pencil boxes in the last trimester, but for now our focus is sharing and being a member of the classroom community.
5