Quick Holiday Centers

A while ago I shared how I use placemats to make centers for my little friends {That post is HERE}. Today I am going to show you a slight variation to that...just in time for December!

Basically we are swapping placemats for plates.... and Halloween for Christmas.

The idea is to just keep you thinking how many possibilities there are to make personalized centers quickly for your class.

These centers I use for early finishers OR to reinforce a skill my class is struggling on.  These may not be a main "job" for the kids, but instead are disguised as fun, mainly because I don't require them to record anything with my placemat or plate centers.

All you need to create your own are clothespins, a Sharpie and some holiday item... in this case a Christmas tree plate from the 99 Cent Store:
As you can see above, I wrote numbers around the edge of the plate with the Sharpie. The students are to match the correct number of dots to the numeral.

When they are done I ask them to share with a friend. Then leave it ready for the next player like this:

Sometimes I will use the same plate for two centers....or rather, for two different skills.

The numbers are the same, but I swap out the clothespins. This group is working on adding one to a number.

To keep things straight I will tag the back of the clothespins like this:
Just another way I have found to use washi tape. I just stick a little piece on the back of each clip. This helps me if I only want to take one version of the game out. But sometimes I will have both versions out and I tell the kids you can do the red one or whatever the case may be....although sometimes that can be tricky.

The point is you can adapt and change to meet the individual needs of your group.

If I am shopping and see a themed placemat or plate available I will usually get it even if I don't have a plan for it at that moment... that way, it will be waiting for me when I need a quick center.... and yes, clothespins are Sharpies are always in my room too.

I hope this is an easy idea you can use!
61

An Old Favorite: The Thanksgiving Placemat

Thanksgiving is right around the corner.

So I'm here today to share my take on an old old favorite craft for this time of year: the woven Thanksgiving placemat.

Kindergarten Thanksgiving Placemat Craft Crayons and Whimsy
This is great for pre-school, kindergarten, first grade or second grade. The kids need to be using their hands to weave and figuring out the patterns of weaving and build on that spacial awareness.

Another reason I love this activity is because some of your little ones who are last to finish a writing lesson may find that they are first to get their mat done...and boy, is that a fun feeling for them!

To prep this I fold orange- or whatever color you like- 12x18 inch construction paper in half. Then I use a pencil and ruler to draw these lines:

The lines are all 2 inches apart and the top line is 2 inches from the edge of the paper.
It is important the straight line across is on the open end of the fold. The bottom is the folded side. In other words- like this:
But leave it folded.... no unfolding... even though some of the kids want to do that! They need to cut on the straight lines AND then unfold it to start weaving....

The strips they weave with are 2 inches as well. They will measure 2x12 inches.

And just a tip... I wouldn't try this whole group with little ones. It is hard and they need a bit of help.

Here is how they look at our kindergarten feast:
Thanksgiving kindergarten feast placemats Crayons and Whimsy

I purposely have chosen to have the kiddos write their names on the back of the mats and have not left a name line on the title cards below. However if you would like their name on there I suggest using the generic one that doesn't have the year listed and will give you more room for a name.


Thanksgiving Placemat Craft Title Page Freebie Crayons and Whimsy

And here is another fun Thanksgiving freebie from my TpT store.... and HERE is a blog post telling you more about it, too!

Night Before Thanksgiving Crayons and Whimsy Freebie

And these are also fun in November!

Thankful Cornucopia Kindergarten Thanksgiving Craft Crayons and Whimsy

Thanksgiving Math Activity Crayons And Whimsy

Pattern Block Math Fall Edition Crayons and Whimsy

And one more Freebie:
Pattern Block Teepee Freebie Crayons And Whimsy

64

Halloween Costume Ideas for Teachers

Yep... it's time for a review of some Halloween Costumes from my school and our creative staff. This is my 3rd year in a row doing a post like this....
A. because I am proud of my school and our Halloween spirit
but...
B. because I want to give you some ideas for EASY costumes that are great for teachers.

You can see the 2014 review here and the 2013 is right here.

But let's move on to  this year...and I also want to say that I work with some creative people, but also some people who are resourceful....so it is possible a few of these ideas are from Pinterest or another blog and I am not able to appropriately credit them because I just don't know.

My kinder team has two very preggo mamas... one of which is me... so we tried to incorporate that into our gig this year. Meet the "K" Basketball team:
Basketball Adult Easy Halloween Costume Idea Crayons and Whimsy Pregnant Costume

The first grade team did a simple Sesame Street theme... but look, these are too much fun:
Sesame Street Adult Easy Halloween Costume Idea Crayons and Whimsy

Second  grade went more traditional with Goldilocks and the Three Bears:

And the most classic costume this year was third grade's ghosts:

Fourth grade made me laugh with the mouth chasing the M&Ms:

Fifth grade won the award- literally, they did win... for best team costume for Operation.... I never would have thought about dressing up as a board game. Love this idea:
Operation Costume Idea Teacher Costumes Crayons and Whimsy
And how about an action shot of all of them showing off this creative team Halloween costume to the whole school at our parade:
Operation Costume Idea Teacher Costumes School dress up ideas
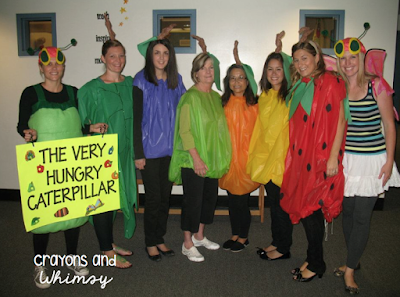
And funny enough while creating this post I found an old picture of my kinder team...I think this is 2011 when we did The Very Hungry Caterpillar. I am the strawberry and if you are wondering.... yes, we are almost all wearing colored tablecloths..... that means our costumes were less than $5. The stems are brown butcher paper twisted up and glued on 99 cent headband.
Hungry Caterpillar easy to make Halloween Costume Kindergarten Teacher

And just for fun I will share what my hubby and I did for Halloween this year. So at about 3:00pm on Halloween....we actually decided to talk about what we should be.... oh, the party starts at 6? We better get on it.  That is so us....for better or worse.

The debate was...do we make a "pregnant Halloween costume" or just a regular one.....after a quick Google search we decided on the "pregnant skeleton costume"- I can't credit just one source, there are countless tutorials and awesome looking ideas for this... so even though it isn't the most novel idea, we liked it.... and decided to try the QUICK one hour version!!!

We ran out and bought some cheap black shirts and sweats, white fabric paint and blue felt.

And then we got back and my hubby was doing this:
Halloween Pregnant Skeleton Costume


And and hour later we had this:
Halloween Pregnant Skeleton Costume
{Sidenote: Don't you love our friend's chalk paint covered surfboard for message writing?!}

And one more with a close up of the "baby"
Halloween Pregnant Skeleton Costume
And that is all my friends.... hope you got a few useful Halloween costume ideas for school, home or wherever you may need to be dressed up!
54

Classroom Tour {October Style}

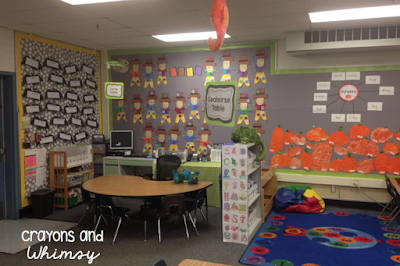
Today I am just here to take you on a quick tour of my classroom in October.
October classroom Crayons and whimsy
Let me be honest and let you know that my desk is never empty on top... EVER! I jut "cleaned" it real quick...which means stuffed things in the drawers.... for the sake of this picture. To the left you see the Deanna Jump inspired palm tree.

Missing from the above picture is one of my favorite features of this classroom... the windows!!!!! So here they are:
October classroom Crayons and whimsy
Those "stained glass" jack-o-lanterns are one of my favorites and you can find the directions for them HERE.

Next, here is a close up of my teaching area:
October classroom Crayons and whimsy
And then my computer is tucked back there and that is my other desk...where actually I spend a bit more time. I got that desk from Ikea because it was small and compact and just worked better than any of the school furniture options.
October classroom Crayons and whimsy kindergarten
Zooming in a bit more... you can see that 1. the desk and my "tablecloth" don't really match. And 2. that really is just a piece of fabric that I am calling a tablecloth. And underneath are many things that I need, don't fit in a filing cabinet and are ugly to look at...so voila... a piece of fabric it is!

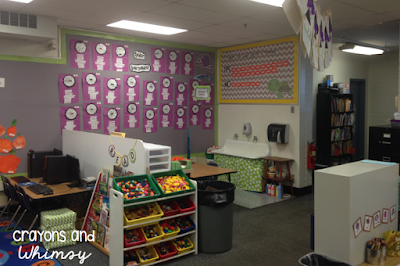
Scooting on over to the right, here is my library area:
October classroom Crayons and whimsy kindergarten library
For more on library organization you can see THIS post

October classroom Crayons and whimsy kindergarten

When I first moved into this classroom and saw the HUGE, UGLY trashcan I thought it was ridiculous....why? But it actually comes in handy because we have a ton of trash in kindergarten. Although it is on my to-do list to make it a bit less of an eye sore!
October classroom Crayons and whimsy kindergarten
Above you see the back corner of my room. This is where volunteers and my aide work on prep. You can see my monthly tubs are under there too {usually for the current month and either the previous or future one} This is also where the kids get pulled back to do any crafts that are one on one....such as those orange clay pumpkins you can see.
October classroom Crayons and whimsy kindergarten
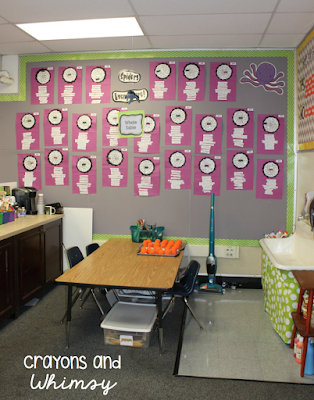
I love love love love having bathrooms in my room. For a kinder teacher it just makes life a bit easier. ..sorry if you don't have them. I also love these scuba kids I got from Spring Hill Graphics {which sadly I can't seem to find her store anymore!} I just added some text and had them blown up nice and big! {And I also include this picture to show you that my book shelf isn't as neat and tidy as others... sorry, that is just how I roll}

The picture below is taken from the same spot... I just turned around 180 degrees:
October classroom Crayons and whimsy kindergarten
The turquoise bucket is there for the kids to drop off their "briefcases' as the come on in the room each day. I talk about that more in this post

And that, my friends, is all for today. It's been showing you around my kindergarten world.
3

Placemats for Easy to Make Centers

Sometimes I need a center or an early finisher activity that is specific to a certain skill... well, not just sometimes... all the time. But sometimes what I need for a particular group or class may be unique and not what I already have.

And I will usually turn to TpT, of course, to remedy this issue.

But occasionally I am in a rush and don't have time to print, laminate and cut a cute new center.... and when that happens this is what I do.....

I make a quick center...usually seasonal.

Here is the one I am going to show you today:

I just made this. I have a ton of upper and lower case letter recognition and matching activities for September. But typically we simmer it down in October usually, moving on to sounds and other skills. This group needs more practice recognizing letters... so I needed a quick fix.

I buy random placemats like these whenever I see them on sale....yep, that is a placemat.

I think I got this one last year... probably on November 1....and it gets thrown in my October drawer. I also will buy themed plates or really anything that is on clearance that I think I can use later.

So could this be any easier?

Here are all my materials: placemat, clothespins and a Sharpie:


I see how many clothespins I can fit... in this case it worked to get 26, which was perfect!
And then we are ready to write... and yes, I realize it isn't 100% equally spaced and some of my letters aren't perfect.....but what is perfect is the part where it took me only ten minutes to make an engaging center my littles NEED and will love!


I tell the kids to leave it just like this when they are finished:

As for me, I will put those clothespins in a Ziploc and clip that onto the placemat. And once in a while I will raffle these off for one friend to take home... usually strategically chosen to be a friend who still needs practice. And I only do that if I don't think I have the room to store it and it won't be needed year after year.

I use placemats for math centers and other literacy skills.... anything where matching happens will work!

So the next time you see some holiday themed placemats on sale...grab them! 
13

Weekend Warriors: Sight Words

Sight words is a topic I could go on and on about. It is also something that I love reading about and grabbing new ideas....so this linky is sure to be a good one!

So I am going to share 2 of my favorite sight word tips... and I have to be honest...these tips came from two older posts I have on sight words that gives even more ideas and info...so I will leave you links to them too.

But here we go.....

This is my favorite. It is a game to use to practice sight words. I introduce this in a small group and will fine tune the words to the needs of that particular level of students.

The main reason I love this game is that it is easy to prep....Sometimes you don't have time to color print, laminate, and cut out some cards to make the cutest sight word game ever! Right? Don't get me wrong, I am all about cute, but sometimes I am all about doing it FAST and meeting the exact needs of my kids.

So...first up... Gobble Gobble Sight Word Game:

Target Dollar Spot is my BFF. That is where I got the felt turkey purse/container thing .... then I used my school's die cut machine to die cut turkeys.

In this case I used the top 10 Fry words... and then 3 cards say, "Gobble, gobble."
 Here are my little ones playing it:
Here's what you do. A group of 3-5 kids can play at once:

1. Pull out one turkey. Read the word.
2. If you can't read the word then have a friend help you read it.
3. If you read the word on your own, keep the card. Otherwise, put it back in the turkey purse.
4. If you draw, "Gobble, gobble!" you have to say, "Gobble, gobble" in your best turkey voice...and sadly lose all of your cards you have collected from previous turns.

The winner is the person to have the most cards when the purse is empty... but to be honest, this little game can last a long time with those "gobble gobble" cards in there.

One reason I don't laminate the cards is because these words were chosen for this year's class... or maybe just this reading group - sometimes different groups have their own words.... So these aren't for use year after year after year... because I have no idea what levels those kids will be.

The best part is that I re-use this game for many many months.....
In October I use ghosts and it is called the "Boo Game" ... In December we play the same game called the "Ho, Ho, Ho Game".....In January with snowmen we play the "Brrr!!!!! Game."

The kids don't realize this is the same game and really enjoy it! You can see my original post HERE for a few more pictures and details

This next idea came from a post with oodles and oodles of ideas that you can find HERE.

I like to use these "magic tubes" (they are test tubes I order from Steve Spangler Science). I've seen other teachers do this same concept with sand instead of water. Can you "see" the word "see"? Why is there glitter floating in that water? It's a short answer: because glitter is fun!

 I sort the letter beads in a box I got from Michaels. There are 2 letters per section, although I will say that putting "E" and "F" together wasn't the best choice I've made:
So I will have between 5-10 tubes out at a time and the kids get to go to this center to just figure out which words are on display.

{P.S. This is also a super fun idea to use with their names at the beginning of the year too, but that is different post}

Lastly, I like to have the parents help me in teaching their children sight words. I have lists I send home throughout the school year. You can check those out here:

Now it's time to check out all these other great sight word ideas:

17

Book Boxes: For the Home


Many of us use book boxes in class. Whether you rock the Ikea magazine holders or some other box for the purpose of holding books......... but I want to talk about book boxes for the home.

We make so many fabulous {if I do say so myself} books in class all year. I send these home and say, "Please read these to your family at home." And then I just cross my fingers that they do.

And not promising the home book box completely solves the problem, but it is a way to help families organize and make reading a priority.

At the beginning of the year I ask the kiddos to make a book box with their family. The note which you can see here {and just click on the letter to download if for yourself!}
asks them to use a box no smaller than a shoe box and as large as they like....but the kid must be able to carry it on their own. I really can't be carrying 27 boxes all on my own :)

I tell them to be creative.... include your favorite characters....or your favorite colors and just have fun with it. At the end of the month the kids bring the boxes to school and we have a "Book Box Parade" around the school.

We pop into a few classrooms of older students, we zoom by the office and the principal and just make sure everyone is super proud of their special box. And of course we all take pictures...I mean we want to make this box the BEST thing ever!

The boxes head back home with the instruction to put the box somewhere accessible to your child and use it to collect all the books your child makes in the classroom. So as they come home with little readers such as color books or whatever it may be...they have one place to put it all. And the best part is that these are ALL books {we hope} that they can read.


15

Alphabet Printing Practice

Today two strange things are happening....

1. I'm blogging

and

2. I posted a new product on TpT

What is going on?

I haven't been around here as often and I apologize. But I wanted to make sure I shared with you my new little product.

Nothing earth shattering, but still a very useful tool....alphabet printing practice.

alphabet printing handwriting practice crayons and whimsy


Each of these pages asks students to practice both the upper and lower case version of the letter. I purposely put a traced letter half way across the row. As in they trace two times....on their own three times... then TRACE AGAIN, followed by three more on their own....

Why?

Because research shows that little ones rarely look ALL the way back to the beginning of a row to reference what the letter SHOULD look like- they just look at the last letter they wrote. So as they progress from left to right their letters get messier and messier as they go...... sound familiar?

So I like a little mid-line refresher to get them back on track.

I also have included 2 or 3 pictures on each page of an item that starts with the letter. I know some people separate their phonics instruction from their handwriting instruction and for that reason I haven't asked the students to identify which items start with each sound - just in case that isn't your focus.  So ALL of the pictures are just a reinforcement...or maybe an introduction....to that letter sound.


As you can see above, I like to bind mine into a book and then I am set for the year....or a few months... but better than making 26 trips to the copier! A cover is included in the set if you want to do the same.

This is one of the few things I do as a whole group - because let's be honest...we can't be in small groups all day... I WISH we could. So this is something that we can tackle as a class. And I love that once the kiddos learn the pattern of the steps required of this book they are set to go.

They even know to put their writing fingers in the air as soon as we open these puppies up. The first thing we do is "air write" the letters every time. I love seeing their fingers ready to go.

I hope to be back around here soon...and I super appreciate YOU are here reading :)

2